Automated Testing
Ren'Py allows creators to put automated tests in their games to make sure that alterations to the game don't break existing functionality. This is especially useful for large games, or for games that are frequently updated.
The two main components of the testing system are the testcase and
testsuite statements.
The renpy.is_in_test() function is helpful to know whether a test is currently
executing or not.
Quick Start
This section shows a minimal example using statements that are common in real testcases:
run Jump("...")to start from a known label.advance until screen "choice"to get to a menu.click "Choice Text"to pick a menu option.click id "..." until not screen "..."to keep clicking until a screen disappears.
First, add the following Ren'Py code to your game script. This is the code that we want to test:
screen quickstart_popup():
    modal True

    frame:
        xalign 0.5
        yalign 0.5

        vbox:
            spacing 12
            text "Quick Start Popup"

            textbutton "Close":
                id "quickstart_close"
                action Hide("quickstart_popup")


label quickstart_demo:
    "Welcome to the testcase quick start demo."

    show screen quickstart_popup
    "Close the popup to continue."

    menu:
        "Take the map":
            "You picked the map."
        "Leave it":
            "You left the map behind."

    "End of demo."
    return
Next, add testcases to execute the code above and verify that it works as expected.
You can put these testcases in the same file as the script above, or in a different file.
For example, you could add the following to a file named testcases.rpy:
testsuite quick_start:
    before testcase:
        run Jump("quickstart_demo")
        advance until screen "quickstart_popup"

    testcase choose_map:
        pause 0.5
        click id "quickstart_close" until not screen "quickstart_popup"
        pause 0.5
        advance until screen "choice"
        click "Take the map"
        advance until "You picked the map."
        pause 0.5

    testcase leave_map:
        pause 0.5
        click id "quickstart_close" until not screen "quickstart_popup"
        pause 0.5
        advance until screen "choice"
        click "Leave it"
        advance until "You left the map behind."
        pause 0.5
Note
The pauses in this demo are not necessary, they are just there to make the test execute a slower so you can see what's happening. In a real test, you can remove them to make the test run faster.
Save the file, then see Running Testcases for how to launch them from the launcher or command line. If you're running the testcase from the command line, the command should look something like this:
./renpy.sh /path/to/game test quick_start
.\lib\py3-windows-x86_64\python.exe renpy.py C:\path\to\game test quick_start
Running Testcases
Launcher
To run tests from the launcher, select the project and press the "Run Testcases" button. If the button is not visible, do the following:
Ensure that you have at least one testcase defined in your game.
Launch the game normally by clicking the "Launch Project" button.
Click the "Refresh" button in the launcher.
This will run the "global" test suite by default.
Command Line
To run tests from the command line, open a terminal in the Ren'Py SDK directory and use the test command:
cd /path/to/renpy
./renpy.sh <basedir> test [<testcase>] [options...]
cd C:\path\to\renpy
.\lib\py3-windows-x86_64\python.exe renpy.py <basedir> test [<testcase>] [options...]
- <basedir>
Specifies the path to the project.
- <testcase>
Specifies the name of the testcase or test suite to run. If not given, the "global" test suite will be run.
- --enable_all
Executes all test cases and test suites, regardless of their
enabledproperty.
- --overwrite_screenshots
Overwrite existing screenshots when a screenshot statement is executed.
- --hide-header
Disables the header at the start of the test run.
- --hide-execution {no|hooks|testcases|all}
Hides information about test execution.
--hide-execution hookshides hooks,--hide-execution testcaseshides test cases and hooks, and--hide-execution allhides everything.
- --hide-summary
Disables the summary at the end of the test run.
- --report-detailed
Shows detailed information about each test during the run.
- --report-skipped
Shows information about skipped tests. This option should be used together with
--report-detailed.
Testcase Statement
The testcase statement creates a named test case. Each case contains a
block of test statements (see below). Test cases are similar to Ren'Py
labels, with a few differences:
The Ren'Py label statement takes Ren'Py code, while the testcase statement takes test statements (listed on this page). They are mutually exclusive.
There is no testcase equivalent of the return statement.
There can be no test statement outside of a test block, while there can be Ren'Py code outside labels.
It takes the following properties:
- description
A string describing the test case. This is used in the test report.
- enabled
If this expression evaluates to
False, this test is skipped. Defaults toTrue.This can conditionally disable tests, for example on platforms where they are not supported.
testcase windows:
    enabled renpy.windows
    ...

testcase not_on_mobile:
    enabled not renpy.mobile
    ...
See Skipping Testcases for more information.
- only
If this expression evaluates to
True, only this test case (and other tests withonly True) will be run. Defaults toFalse.See Skipping Testcases for more information.
- xfail
If this expression evaluates to
True, the test is expected to fail. If the test does fail, it will be marked as xfailed instead of failed. Defaults toFalse.
- parameter
A variable name (or tuple of variable names) and a list of values (or list of tuples of values). The test will run once for each value (or tuple of values) in the list.
A test may have multiple
parameterproperties, in which case the test will run for every possible combination of the values.See Parameterized Tests for more information.
Testsuite Statement
The testsuite statement is used to group test cases together. Test suites
can contain test cases, other test suites, and hooks (see below).
The default test suite is named global, and it is automatically created
by Ren'Py if not specified by the user. It contains all other top-level test suites
and test cases in the game.
It takes the same properties as the testcase statement.
Hooks
The testsuite statement can contain the following hooks:
- setup
A block of test statements that is executed at the beginning of the testsuite, before running any tests contained within the current suite.
- before testsuite
A block of test statements that is executed before each test suite within the current suite.
- before testcase
A block of test statements that is executed before each test case within the current suite.
- after testcase
A block of test statements that is executed repeatedly, running after each test case in the current suite. This is run even if the testcase fails or raises an exception.
- after testsuite
A block of test statements that is executed repeatedly, running after each test suite in the current suite. This is run even if the testsuite fails or raises an exception.
- teardown
A block of test statements that is executed after running all tests contained within the current suite. This is run even if a test fails or raises an exception.
The before * and after * hooks take the following properties:
- depth
An integer specifying how deep the hook should apply.
For testcases, defaults to
-1, meaning it applies to all nested test suites and test cases.For testsuites, defaults to
0, meaning it applies only to test suites directly contained within the current suite.For more information, see Lifecycle of a Test Run.
Lifecycle of a Test Run
This section describes the order in which testcases and testsuites are executed, and how the hooks are called. The following example illustrates this:
Code |
Execution Order |
|---|---|
label test_demo:
    "This is a demo for testcases."
    "It has a few messages and a menu."
    menu:
        "First Choice":
            "Selected first choice."
        "Second Choice":
            "Selected second choice."
        "Third Choice":
            "Selected third choice."
    return

testsuite global:
    setup:
        $ print("global :: setup")
        skip until screen "main_menu"

    before testsuite:
        $ print("global :: before testsuite")
        if not screen "main_menu":
            run MainMenu(confirm=False)
        click "Start"

    before testcase:
        $ print("global :: before testcase")

    after testcase:
        $ print("global :: after testcase")

    after testsuite:
        $ print("global :: after testsuite")

    teardown:
        $ print("global :: teardown")
        exit

    testsuite basic:
        testcase first_testcase:
            $ print("basic :: first_testcase")
            advance

    testsuite test_choices:
        setup:
            $ print("test_choices :: setup")

        before testcase:
            $ print("test_choices :: before testcase")
            run Jump("test_demo")
            advance until screen "choice"

        after testcase:
            $ print("test_choices :: after testcase")

        teardown:
            $ print("test_choices :: teardown")

        testcase choice1:
            $ print("test_choices :: choice1")
            click "First Choice"

        testcase choice2:
            enabled False
            $ print("test_choices :: choice2 (disabled)")
            click "Second Choice"

        testcase choice3:
            $ print("test_choices :: choice3")
            click "Third Choice"
|
global :: setup global :: before testsuite global :: before testcase basic :: first_testcase global :: after testcase global :: after testsuite global :: before testsuite test_choices :: setup global :: before testcase test_choices :: before testcase test_choices :: choice1 test_choices :: after testcase global :: after testcase global :: before testcase test_choices :: before testcase test_choices :: choice3 test_choices :: after testcase global :: after testcase test_choices :: teardown global :: after testsuite global :: teardown |
Note that global :: before testcase and global :: after testcase are
executed before and after each test case, even if the test case is inside a
nested test suite.
In order to limit the scope of a hook, set its depth property.
Setting it to 0 will make the hook execute only for tests
directly inside the test suite containing the hook.
For example:
testsuite global:
    before testcase:
        depth 0
        $ print("Starting a testcase.")
On the other hand, the before testsuite and after testsuite hooks
have a default depth of 0, meaning they will only execute for testsuites
directly inside the testsuite containing the hook.
To increase the scope of a hook to include nested testsuites and testcases,
set its depth property to -1 (for infinite depth) or to a positive
integer (for a specific depth).
Note
When a testsuite finishes executing, the game doesn't close itself. Instead, it will return control of the game back to the player, awaiting user input.
To close the game after a testsuite, you can use the exit test
statement in the after hook of the testsuite:
testsuite global:
    teardown:
        exit
Skipping Testcases
If a testcase is skipped, it will not be executed. In addition, the
before testcase and after testcase hooks of the testsuite will not be executed
for that testcase.
If all tests are skipped in a testsuite, then the setup and
teardown hooks will not be executed either. In addition, the
before testsuite and after testsuite hooks will not be executed from
the parent testsuite(s).
Parameterized Tests
A test case can run multiple times with different values by using the parameter property.
To do this, give a variable name and a list of values. The test will run once for each value in the list. For example:
testcase click_buttons:
    parameter button_name = ["Load", "Save"]
    click expression button_name
This runs twice: first clicking "Load", then clicking "Save".
Parameters should be thought of as defining multiple testsuites or testcases, with
the hooks (including setup and teardown) being run for each value.
Grouped Parameters
It is possible to specify several variables at once by grouping them in parentheses and giving a list of value groups. For example:
testcase addition:
    parameter (x, y, z) = [ (1, 2, 3), (2, 3, 5), (3, 5, 8) ]
    assert eval (x + y == z)
This will run three times, using the following values:
(x=1, y=2, z=3), (x=2, y=3, z=5), and (x=3, y=5, z=8).
Parameter Combinations
If multiple parameter properties are provided, the test case will run
for every possible combination of the values. For example:
testcase combinations:
    parameter a = [1, 2]
    parameter b = [3, 4]
    parameter c = [5, 6]

    assert eval (a + b + c in [9, 10, 11, 12])
This will run eight times, once for each combination of (a, b, c):
(1, 3, 5),(1, 3, 6),(1, 4, 5),(1, 4, 6),(2, 3, 5),(2, 3, 6),(2, 4, 5),(2, 4, 6)
It is possible to mix grouped parameters with non-grouped parameters. For example:
testcase mixed:
    parameter a = [1, 2]
    parameter (b, c) = [ (3, 5), (4, 6) ]

    assert eval (a + b + c in [9, 10, 11, 12])
This will run four times, using these combinations for (a, (b, c)):
(1, (3, 5)),(1, (4, 6)),(2, (3, 5)),(2, (4, 6))
Using Parameters in Expressions
You can use parameters in any test property that takes an expression.
For example, here's a test that runs three times, once for each value of x.
The test will pass when x is 0 or 1, and will be expected to fail (xfail) when x is 2:
testcase choice_test:
    parameter x = [0, 1, 2]
    xfail x == 2

    assert eval (x < 2)
You can also use parameters to select screens or buttons by name.
For example, this test will click either the "first" or "second" choice,
depending on the value of choice_text:
testcase show_menu:
    parameter screen_name = ["preferences", "load"]

    run ShowMenu(screen_name)
    pause until screen screen_name
    run Return()
Parameters can be used, preceded by expression, to select a button by
parameter name.
- testcase click_buttons:
parameter button_name = ["Load", "Save"]
click expression button_name
Parameters can also be used inside Python code blocks.
For example, this test prints the current values of x and y,
and then clicks at that position:
testcase param_test:
    parameter (x, y) = [(0.0, 0.0), (0.5, 0.5), (1.0, 1.0)]

    $ print(f"Clicking at position ({x}, {y})")
    click pos (x, y)
Parameterized Test Suites
Parameters can also be provided to the whole test suite. In this case, all hooks and test cases inside the suite will run once for each parameter set.
Each parameterized run will execute the setup, before/after testsuite,
and teardown hooks.
For example:
testsuite math_tests:
    parameter (x, y, z) [ (1, 2, 3), (2, 3, 5), (3, 5, 8) ]

    setup:
        $ print(f"Running math tests with x={x}, y={y}, z={z}")

    testcase addition:
        assert eval (x + y == z)

    testcase multiplication:
        assert eval (x*y == z*y - y*y)
Parameters may be nested, and all combinations will be tested. For example:
testsuite parameter_field:
    parameter choice_text = ["first", "second"]

    testcase param_test2:
        parameter (x, y) = [(0.0, 0.0), (0.5, 0.5)]

        advance until screen "choice"
        click choice_text
        click pos (x, y)
This will run four times, once for each combination of (choice_text, (x, y)):
("first", (0.0, 0.0)),("first", (0.5, 0.5)),("second", (0.0, 0.0)),("second", (0.5, 0.5))
Warning
Parameters are passed by reference. If you change a mutable parameter (e.g. a list or dict), that value will be affected in all other tests that share the same object.
Exceptions And Failures
If an error occurs during a test case:
The test case will stop executing immediately
The
after testcasehook of the testsuite containing the test case will runIf there are more test cases, they will continue to be executed (including the
before testcasehook)If no more test cases exist, the
afterhook of the testsuite will run
If an error occurs during a hook (eg. before testcase):
The test suite will stop executing immediately
If the suite was called by another suite, the parent suite will continue executing.
If no parent suite exists, the game will end the test run.
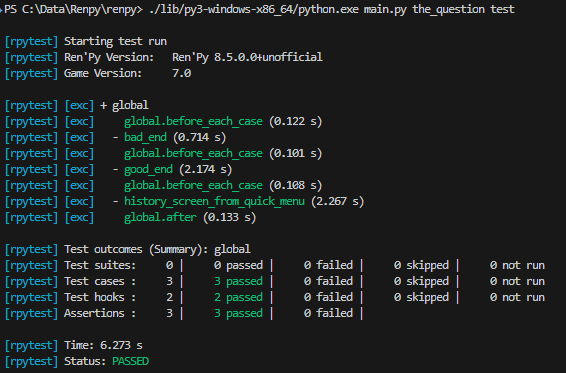
Test Reporting
After a test run, a report is printed to the console, listing all test cases
and their results. If the --print_details option is provided, the report
will include additional information about each test.
Below is an example of a test report after successfully testing "The Question":
Test results
A test can have one of the following results:
Passed: The test executed successfully, without any errors.
Failed: The test executed, but one of the statements failed.
XFailed: The test was expected to fail (because its
xfailproperty evaluated toTrue), and it did fail.XPassed: The test was expected to fail (because its
xfailproperty evaluated toTrue), but it passed instead.Skipped: The test was skipped, either because its
enabledproperty evaluated toFalse, or because another test withonly Trueexists.
In general, a test is considered successful if it passed or xfailed, and unsuccessful if it failed or xpassed.
Test Settings
The following variables can be set to change the behavior of tests:
- _test.maximum_framerate
A boolean specifying whether to use maximum framerate mode during tests. This will unlock the framerate beyond your screens refresh rate if possible. Defaults to
True.
- _test.timeout
A float specifying the maximum number of seconds a test statement should wait for a condition to be met. Defaults to
10.0.This can be overridden on a per-statement basis by providing a
timeoutproperty to statements that support it (likeassertanduntil).
- _test.force
A boolean specifying whether to force the test to proceed even if
renpy.config.suppress_underlayisTrue. Defaults toFalse.
- _test.transition_timeout
A float specifying the maximum number of seconds to wait for a transition to complete before skipping it and proceeding with the test. Defaults to
5.0.
- _test.focus_trials
An integer specifying how many times the test system should try to find a valid spot to move the mouse when using a selector without a position. Defaults to
100.
- _test.screenshot_directory
A string specifying the directory to store screenshots in. Defaults to
tests/screenshots.
- _test.vc_revision
The version control (often git) revision of the current source tree, if available. Defaults to the RENPY_TEST_VC_REVISION environment variable, or an empty string if not set.
Test Statements
Test statements are the building blocks of test cases. They can be broadly divided into three categories: command statements, condition/selector statements, and control statements.
Basic Commands
Advance
Type: Command
- advance
Advances the game by one dialogue line.
advance
advance until screen "choice"
Exit
Type: Command
- exit
Quits the game without calling the confirmation screen. Does not save the game when quitting.
if eval need_to_confirm:
    # Asks for confirmation, and autosaves if config.autosave_on_quit is True
    run Quit(confirm=True)

if eval persistent.quit_test_using_action:
    # Does not ask, but still autosaves if config.autosave_on_quit is True
    run Quit(confirm=False)

exit # neither asks nor autosaves
Pass
Type: Command
- pass
Does not do anything. It's a no-op, allowing for empty testcases.
testcase not_yet_implemented:
    pass
Pause
Type: Command
- pause [time (float)]
Pauses test execution for a given number of seconds. Similar to the Pause Statement, but requires a value, or it can be specified without a time if it is followed by an until clause.
pause 5.0
pause until screen "inventory"
Run
Type: Command
- run <action>
Runs the provided screen-language action (or list of actions).
Ready if and when a button containing the provided action (or list) would be sensitive.
testcase chapter_3:
    run Jump("chapter_3")
Skip
Type: Command
- skip [fast]
Causes the game to begin skipping. If the game is in a menu context, then this returns to the game. Otherwise, it just enables skipping.
If fast is provided, the game will skip directly to the next menu choice.
skip
skip fast
skip until screen "choice"
Mouse Commands
Click
Type: Command
- click [button (int)] [selector] [expression (expr)] [pos (x, y)]
Executes a simulated click on the screen. It takes the following optional properties:
buttonspecifies which button of the simulated mouse is to be clickedwith. It takes an integer and defaults to 1. 1 is a left-click, 2 is a right-click, 3 is a middle-click, 4 and 5 are additional buttons found on some mouses. Normally only 1 and 2 trigger any response from Ren'Py.
expressionspecifies a test expression that identifies the click target.It is evaluated according to the rules of the pattern-taking clause.
If selector and/or pos are given, the virtual test mouse is moved according to
the rules of the move statement before the click is sent.
Click behaves like a pattern-taking clause which would
not be given a pattern: if no pos is provided, it will look for a neutral
place where a click would not occur on a focusable element.
# Click at the current mouse position
click

# Click a button with specific text
click "Start"

# Right-click on a specific target.
click id "inventory_button" button 2

# Click the center of the selected target.
click id "inventory_button" pos (0.5, 0.5)

# Click a button using an expression.
$ button_name = "Load"
click expression button_name
Drag
Type: Command
- drag <[selector] [pos (x, y)]> to <[selector] [pos (x, y)]> [button (int)] [steps (int)]
Simulates a drag action on the screen. It takes the following properties:
The first part (before the
to) specifies the starting point of the drag. It takes an optionalselectorand/orposproperty, which are interpreted according to the rules of the move statement.The second part (after the
to) specifies the ending point of the drag. It also takes an optionalselectorand/orposproperty, which are interpreted according to the rules of the move statement.buttonspecifies which button of the simulated mouse is to be used for the drag. It takes an integer and defaults to 1. 1 is a left-click, 2 is a right-click, 3 is a middle-click, 4 and 5 are additional buttons found on some mouses. Normally only 1 and 2 trigger any response from Ren'Py.stepsspecifies how many intermediate steps the drag should take. It takes an integer and defaults to 10. More steps result in a smoother drag, but also take more time.
drag id "item_icon" to id "inventory_slot_3" button 1 steps 20
drag pos (100, 200) to pos (400, 500) button 1
drag id "item_icon" pos (0.5, 0.5) to pos (300, 400) steps 5
drag pos (50, 50) to id "inventory_slot_1"
drag pos (50, 50) to pos (150, 150)
Move
Type: Command
- move [selector] [pos (x, y)]
Moves the virtual test mouse to a given position on the screen.
If a selector is given, and:
If
posis specified, the mouse is moved to that position relative to the selector.If no
posis specified, the mouse attempts to find a pixel that would focus the selector if clicked. This takes into account things likefocus_mask.
If no selector is given, and:
If
posis specified, the mouse is moved to that position relative to the screen.If no
posis specified, an error is thrown.
# Move to a random clickable point within `back_btn`
move id "back_btn"

# Move to the center of `back_btn`
move id "back_btn" pos (0.5, 0.5)

# Move to a point 20 pixels right and 10 pixels down from the top-left corner of `back_btn`
move id "back_btn" pos (20, 10)

# Move to the top right corner of the screen
move pos (1.0, 0.0)

# Move to a point 20 pixels right and 10 pixels down from the top-left corner of the screen
move pos (20, 10)
Scroll
Type: Command
- scroll [amount (int)] [selector] [pos (x, y)]
Simulates a scroll event. It takes the following optional properties:
amountspecifies how many "notches" to scroll. It takes an integer and defaults to1. Positive values scroll down, negative values scroll up.If
selectorand/orposare given, the virtual test mouse is moved according to the rules of the move statement before the scroll is sent.
scroll "bar"
scroll id "inventory_scroll"
scroll amount 10 id "inventory_scroll" pos (0.5, 0.5)
scroll # scrolls down at the current mouse position
Note
This only simulates the mousewheel event. You may consider using the Scroll action from Screen Actions, Values, and Functions.
run Scroll("inventory_scroll", "increase", amount="step", delay=1.0)
Keyboard Commands
Keysym
Type: Command
- keysym <keysym> [selector] [pos (x, y)]
Simulate a keysym event. This includes the keys of config.keymap.
If selector and/or pos are given, the virtual test mouse is moved according to
the rules of the move statement before the keysym is sent.
keysym "skip"
keysym "help"
keysym "ctrl_K_a"
keysym "K_BACKSPACE" repeat 30
keysym "pad_a_press"
Type
Type: Command
- type <string> [selector] [pos (x, y)]
Types the provided string as if it was typed on the keyboard.
If selector and/or pos are given, the virtual test mouse is moved according to
the rules of the move statement before the text is sent.
type "Hello, World!"
Condition Statements
Conditions are used to check whether a certain condition is true or not.
They are used in condition-taking test statements
like if, assert or until.
Boolean Values
Tests can use the literal boolean values True and False.
These are always ready.
if True:
    click "Start"

if False:
    click "Settings" # does not execute, since the condition is always false
Boolean Operations
Conditions support the
not,andandoroperators. That expression may or may not be enclosed in parentheses.assert eval (renpy.is_in_test() and screen "main_menu") advance until "ask her right" or label "chapter_five" click "Next" until not screen "choice"
Eval
Type: Condition
- eval <expression>
Evaluates the provided python expression. This exists only to be used inside condition-taking test
statements like assert, if or until.
assert eval (renpy.is_in_test() and ("Ren'Py" in renpy.version_string))
Note
Differences between a dollar-line and the eval clause:
Eval cannot be used on a line by itself, it must be used inside a statement like
iforuntil, while dollar-lines must be on their own line.A dollar-line executes any python statement, which does not necessarily have a value - for example
$ import math- while the eval clause requires a return value.
Label
Type: Condition
- label <labelname>
Checks if the provided Ren'Py label has been reached since the last time a test statement was executed.
Considering the following example:
run Jump("chapter_1")
assert label chapter_1 # works
assert label chapter_1 # fails
The first assert statement works because the label chapter_1 has been
reached by the run Jump("chapter_1") statement. The second assert
statement fails because the label chapter_1 has not been reached again
since the first assert statement.
That also means the following example will not work:
run Jump("chapter_1")
advance repeat 3
assert label chapter_1 # fails
Warning
This test statement should not be confused with the Ren'Py native label statement it refers to, or with the unrelated label element used in screens.
Selector Statements
Selector statements are used to check if a certain element is on the screen, and to use that element for further actions.
Selectors are a special kind of condition.
Displayable Selector
Type: Condition, Selector
Check if a screen or element with given id is currently displayed.
It takes one parameter, the name of the screen. It takes the following properties:
- screen <name>
The name of the screen to check.
- id <name>
The id of the element to check.
- layer <name>
The layer on which the screen is displayed. If not given, the layer is automatically determined by the screen name.
if screen "main_menu":
    click "Start"

advance until id "inventory_viewport" layer "overlay"

click "Close" until not id "close_button"
Text Selector
Type: Condition, Selector
- "<text>" [raw]
- expression <expression> [raw]
The text selector takes a string which resolves to a target
found on the screen. The search is performed by going through all focusable
elements on the screen (which are typically buttons and the main textbox),
and looking through their text and alt text.
This search is case-insensitive and looks for the shortest match.
For example, if the string "log" is given, and the screen contains
the texts "CATALOG" and "illogical", the target
will be the "CATALOG" text.
If raw is given, the search is performed on the text as given in the
script, before translation and interpolation.
If not given, the search is performed on the text as it appears on screen,
after translation and interpolation.
If expression is given, the string to search for is determined by evaluating the provided expression.
# This may be in a button
skip until "Start Game"

# This may be in the main textbox
advance until "Hey, that's not fair!"

# Case-insensitive search
assert "AsK HeR RighT AwaY"

# Search unsubstituted text
assert "Welcome, Eileen!"
assert "Welcome, [player_name]!" raw

# Search untranslated text after changing the language
run Language("japanese")
assert "スタート"
assert "Start" raw
Control Statements
These statements control the flow of the test execution.
Assert
Type: Control
- assert <condition> [timeout (float)] [xfail (bool)]
This statement takes a condition and raise a RenpyTestAssertionError if the condition is not met at the time when the assert statement executes.
If a timeout is given, the statement will wait up to that many seconds
for the condition to be met. If the condition is not met within that time,
the assertion fails.
If xfail is set to True, the assert statement is expected to fail.
This inverts the meaning of the statement: if the condition is met, the
assertion fails. If the condition is not met, the assertion passes.
assert screen "main_menu"
assert eval some_function(args)
assert id "start_button" timeout 5.0
See also
For
Type: Control
- for <variable> in <iterable>
This statement executes a block of test statements for each item in the provided iterable. You can use break and continue statements to control the flow of the loop.
Example:
# Click "Next" three times
for _ in range(3):
    click "Next"

# Click each of the choices, skipping "Trade" if the shop is not unlocked
for choice in ["Talk", "Trade", "Leave"]:
    if eval (choice == "Trade" and not persistent.shop_unlocked):
        continue
    click expression choice
    if screen "shop":
        break

# Click each of the tabs in the stats screen, skipping "Quests" if quests are not enabled
for stat_tab in ["Stats", "Skills", "Quests"]:
    click expression stat_tab
    if eval (stat_tab == "Quests" and not persistent.quests_enabled):
        continue
    assert text stat_tab timeout 2.0
If
Type: Control
- if <condition>
This statement executes a block of test statements if and when the provided condition is met.
Example:
if label "chapter_five":
    exit

if eval (persistent.should_advance and i_should_advance["now"]):
    advance
The elif and else statements can be used to add
additional conditions to the if statement.
if eval persistent.should_advance:
    advance
elif eval i_should_advance["now"]:
    advance
else:
    click "Start"
Repeat
Type: Control
- <command> repeat <number> [timeout (float)]
Repeats a statement for a given number of times. It consists of an
Command statement on the left-hand side and a number of repetitions
on the right-hand side, separated by the word repeat.
click "+" repeat 3
keysym "K_BACKSPACE" repeat 10
advance repeat 3
Screenshot
Type: Command
- screenshot <path> [max_pixel_difference (int or float)] [crop (x, y, width, height)]
Takes a screenshot of the current screen and saves it to the provided path.
pathspecifies the path (relative to_test.screenshot_directory) where the screenshot will be saved. It may include a file extension. Only.pngis supported.max_pixel_differencespecifies how many pixels may differ between the taken screenshot and an existing screenshot for the test to pass. Integer values specify the number of pixels, while float values specify a percentage of the total number of pixels. Defaults to0.cropspecifies a rectangle to crop the screenshot to, given as(x, y, width, height). Coordinates must be given as integers.
If the project is in a git repository, the hash of the current commit is
automatically appended to the filename as @{hash}.png. This allows
the developer to track changes to screenshots over time.
If the file already exists, the current screenshot is compared to the existing
file. If the files differ by more than max_pixel_difference pixels, a
RenpyTestScreenshotError is raised.
To overwrite an existing screenshot, either delete the file or run the test with
the --overwrite_screenshots command-line option.
screenshot "screens/main_menu.png"
screenshot "screens/inventory" max_pixel_difference 0.01
screenshot "button.png" crop (10, 10, 100, 50)
This may be used in a parameterized test to take multiple screenshots:
testcase screen_tester:
    parameter screen_name = ["inventory", "stats", "map"]

    run Show(screen_name)
    screenshot f"screens/{screen_name}.png"
Until
Type: Control
- <command> until <condition> [timeout (float)]
Repeats a statement until a condition is met. It consists of an
Command statement on the left-hand side and a condition on the right-hand
side, separated by the word until.
If and when the condition on the right is met, control is passed to the next statement. Otherwise, the left-hand statement is executed repeatedly until the condition is ready.
If a timeout is given, the statement will wait up to that many seconds
for the condition to be met. If the condition is not met within that time,
a RenpyTestTimeoutError is raised.
This timeout temporarily overrides the global _test.timeout setting.
advance until screen "choice"
click "Next"
advance until label "chapter_5"

skip until screen "inventory" timeout 20.0
While
Type: Control
- while <condition>
This statement executes a block of test statements while the provided condition remains met. You can use break and continue statements to control the flow of the loop.
Example:
$ should_advance = True
while eval should_advance:
    advance
    if screen "main_menu":
        break

    $ should_advance = some_evaluation_function()
Python Blocks And Dollar-Lines
A python block or a One-line Python Statement can be added
within a testcase. Unlike in normal Ren'Py code, the python blocks don't take
the in substore parameter, but it does take the hide keyword. They
(both) allow execution of arbitrary python code.
Init code gets executed before the test occurs, so functions and classes defined
in init python blocks can be called in test python blocks and in test
dollar-lines. For example:
init python in test:
    def afunction():
        if renpy.is_in_test():
            return "test"
        return "not test"

testcase default:
    $ print(test.afunction()) # ends up in the console